Saturday, December 28, 2013

How to Make a Video Game With Cmd

  1. 1- Anything in apostrophes can be changed, it won't affect the game - don't accidentally type it in to the actual code.
  2. 2
  3. Open Notepad or any other coding programs-Geany, Notepad++, etcetera.Save the file as ‘My Game’.bat

  4. 3
    Start the Code. Start by typing:
    • @echo off
    • title ‘My Game’
    • color zz
    • if "%1" neq "" ( goto %1)
    • pause
  5. 4
    Add Colours. Now save it and run, it will come up with an error and all the different colour combinations. Find the one you like and type it in after “color”, instead of “zz”. A good combination is color 0A, it makes the text green and the background black.
  6. 5
    Create the Menu. To create the menu get rid of pause and type in:
    • :Menu
    • cls
    • echo ‘1. Start’
    • echo ‘2. Instructions’
    • echo ‘3. Exit’
    • set /p answer=‘Type the number of your option and press enter.’
    • if %answer%==1 goto ‘Start_1’
    • if %answer%==2 goto ‘Instructions’
    • if %answer%==3 goto ‘Exit’
  7. 6
    Creating ‘Exit’ and ‘Instructions’. To create the exit screen type in this:
    • :‘Exit’
    • echo Thanks for playing !
    • exit /b
    • Now for the instructions type in:
    •  :‘Instructions’
    • cls
    • echo ‘Instructions’
    • echo.
    • Then write:
    • echo ‘Your instructions here’
    • As many times as you like then type:
    • pause
    • goto Menu
  8. 7
    Begin the game. Type in a scenario:
    • :Start_1
    • cls
    • echo ‘You have run into bad guys. Their forces are:’
    • echo ‘3 farmers’
    • echo ‘You have a high chance of winning.’
    • set /p answer=‘Would you like to fight or run?’
    • if %answer%==‘Fight’ goto ‘Fight_1’
    • if %answer%==‘Run’ goto ‘Run_1’
  9. 8
    Fighting and Running. Now to make fighting and running:
    • :Run_1
    • cls
    • echo You ran away safely !
    • pause
    • goto ‘Start_1’
    • :Fight_1
    • echo You have chosen to fight.
    • echo The battle is waging.
    • goto Fight_1_Loop
    • :‘Fight_1_Loop’
    • set /a num=%random%
    • if %num% gtr 4 goto ‘Fight_1_Loop’
    • if %num% lss 1 goto ‘Fight_1_Loop’
    • if %num%==1 goto ‘Lose_Fight_1’
    • if %num%==2 goto ‘Win_Fight_1’
    • if %num%==3 goto ‘Win_Fight_1’
    • if %num%==4 goto ‘Win_Fight_1’
    • :‘Lose_Fight_1’
    • cls
    • echo Sorry, you lost the battle :(
    • pause
    • goto Menu
    • :‘Win_Fight_1’
    • cls
    • echo Congrats, you won the fight!
    • set /p answer=‘Would you like to save?’
    • if %answer%==‘Yes’ goto ‘Save’
    • if %answer%==‘No’ goto ‘Start_2’
    • :‘Save’
    • goto ‘Start_2’
    • Now you can repeat the code used in ‘Start_1’ to create a second fight and a third and fourth and so on.
    • Also when you type e.g. :Fight_1 you also have to make sure that parts that say goto Fight_1 stay the same as each other so if you change one you have to change both.
    • I don’t currently know how to do the save thing
    • Unable to launch is a very common error.

  • TIPS
  • Remember, whenever you want something to be seen by the player, you have to type echo in front of it.
  • Check your batch script carefully and you will notice the wrong thing.
  • Play your game along the way, even if you don't have the whole thing done. It will help you to see how what you type corresponds with what you get and detect errors.
  • If you need to get out during the middle of a test run of your game, type Ctrl-C.
  • Batch files in Windows can be put to many uses automating tasks, but writing a text game like this is a fun way to learn how they work.

Sunday, December 15, 2013

Make your Computer Welcome You

Make your Computer Welcome You

Do you watch movies? Have you always loved the way how Computers in movies welcome their users by calling out their names? I bet that you too would want to know how you can achieve similar results on your PC and have a computer said welcome.

Then you are at the right place, this article describes exactly how you can make your computer welcome you like this.

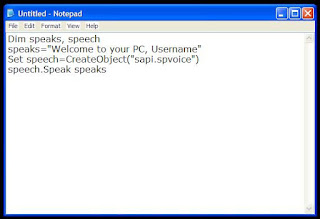
With this trick, you can make your Computer welcome you in its computerized voice. You can make your Windows based computer say "Welcome to your PC, Username."

Make Windows Greet you with a Custom Voice Message at Startup

To use this trick, follow the instructions given below:-

  1. Click on Start. Navigate to All Programs, Accessories and Notepad.
  2. Copy and paste the exact code given below.
Dim speaks, speech
speaks="Welcome to your PC, Username"
Set speech=CreateObject("sapi.spvoice")
speech.Speak speaks
     3.  Replace Username with your own name.
     4.  Click on File Menu, Save As, select All Types in Save as Type option, and save the file as Welcome.vbs or "*.vbs".
     5.  Copy the saved file.
     6.  Navigate to C:\Documents and Settings\All Users\Start Menu\Programs\Startup (in Windows XP) and to C:\Users\ {User-Name}\AppData\Roaming\Microsoft\Windows\Start Menu\Programs\Startup (in Windows 8, Windows 7 and Windows Vista) if C: is your System drive. AppData is a hidden folder. So, you will need to select showing hidden folders in Folder options to locate it.
     7.  Paste the file.


 Make your Computer Welcome you at startup

Now when the next time you start your computer, Windows will welcome you in its own computerized voice.

Note: For best results, it is recommended to change sound scheme to No Sounds.
You can change the sound scheme to No Sounds by following the steps given below:-
  1. Go to Control Panel.
  2. Then click on Switch to Classic View.
  3. Then Click on Sounds and Audio Devices.
  4. Then Click on the Sounds Tab.
  5. Select No Sounds from the Sound Scheme option.
  6. If you wish to save your Previous Sound Scheme, you can save it by clicking Yes in the popup menu.
  7. Click on OK.
Change Sound Scheme to No Sounds

Try it yourself to see how it works. In my personal opinion, this is an excellent trick. Whenever I start my PC in front of anybody and the PC welcomes me, the fellow is left wondering how brilliant a computer do I have.

Cool JavaScript Tricks: Edit Websites in Browser (Live)

Cool JavaScript Tricks: Edit Websites in Browser (Live)

Imagine a world where you are a God and have ultimate control on what happens and more importantly, how it happens. Seems too good a dream. Now it has come true, at least for the online world.

JavaScript tricks
Using this trick, you will be able to edit any webpage live in your browser as if it was a Wiki and change the details according to your wish. Yes, you read that right. You can edit Google or even Facebook for that matter right in your browser and that too without requiring any technical know-how or getting deep into hacking and cracking.

Here is an example picture demonstrating the Google Homepage edited by me to say that I own Google.
Edit Websites Browser

This is just an example. You can use it for anything like showing wrong traffic stats or for fooling people by showing that someone said something about them on Facebook or Twitter. It depends only on your creativity. But I would advise you to stay ethical and use it for entertainment purposes only.

(Mozilla Firefox does not support this. If you use Firefox, you can use the bookmarklets given at the end of this post. If you use Google Chrome and the code does not seem to work, precede it with "javascript:" without quotes.)

To use this trick, all you need to do is just copy the code given below and paste it in your address bar after you have opened the website you wish to edit. And start editing.

javascript:document.body.contentEditable%20=%20'true';%20document.designMode='on';%20void%200
You can capture a screenshot by pressing the Print Screen key or by using the Snipping Tool if you use Windows 7 or Windows Vista. If you wish to again make the website non-editable to give a more authentic look, copy and paste the code given below in the address bar after you are done editing (does not work in Firefox).

javascript:document.body.contentEditable%20=%20'false';%20document.designMode='off';%20void%200

Or, alternatively you can use the following bookmarklets by dragging them to your Bookmarks bar.

1.  Edit this Website

2.  Done Editing

The editing that you do will however be temporary as it is not server-sided. You can also save the modified website through your browser by File>Save. This works on all common web browsers including Chrome, Firefox, Opera and Internet Explorer.

Know if your neighbours are stealing your Wifi connection

 Know if your neighbours are stealing your Wifi connection
command prompt codes
Command Prompt can let you know if someone is connected to your Local Area Connection and using it. Just follow the steps:- 
1) Open your browser and visit http://192.168.1.1 or http://192.168.0.1 depending on your router. 
2) Find the tab that mentions “Attached Devices” or something similar.
3) Find the computer name, IP address and MAC Address (sometimes called Physical Address or Hardware Address) of your computer using the previous trick.
4 )Compare it with those displayed by your router in Step 2. If you notice some strange devices, then your neighbour has been sneaking in on your internet connection and it is best to set a password.

How to Increase Firefox Speed, Make Firefox Faster

How to Increase Firefox Speed, Make Firefox Faster

Mozilla Firefox is one of the most popular web browsers in the world, and for good reason. In addition to it being free, Firefox provides a reliable and secure internet surfing experience that many people prefer over other browsers. But like those other browsers, Firefox’s speed can sometimes begin to deteriorate. When this happens, it might take you longer to load certain webpages or download certain files, which can be quite frustrating. If your Firefox speed is suffering, the following tips and shortcuts will help you increase your speed and get Firefox back to normal in no time at all.

Make Firefox faster

Quick Speed Tweaks

There are a few quick tweaks that can really increase the speed at which Firefox runs. First of all, you will want to open your Firefox browser. Go up to the address bar and type in "about:config," minus the quotation marks, of course. Once those words are typed, hit enter. Next you want to type "network.http" in the filter bar. When the settings pop up, double-click to change the "network.http.pipelining" setting to true. This should increase your browsing speeds, but may not work if you are running on a proxy server. If you are indeed using a proxy server, you should set "network.http.proxy.pipelining" to true as well by double-clicking on it. After that, change "network.http.pipelining.maxrequests" to 8. Changing this number to 8 will allow Firefox to load more than one item at once when you go to any given webpage.

For the next speed tweak, you will want to stay in the "about:config" menu, just like in the prior tweaks. Right-click anywhere in the window, select "new," then "integer" from the drop-down menu. Call the preference name "nglayout.initialpaint.delay," then change the value to the number 0. Adjusting this setting will lower the amount of time Firefox waits before displaying a webpage’s content. There are also many other settings that can be tweaked in the "about:config" menu. Some are very advanced and should only be altered by users who are very familiar with Firefox's settings.

If you have a lot of add-ons installed, Firefox could take a lot of time to startup. Removing useless extensions and plugins would help with that.

Other Firefox Shortcuts
Make Firefox faster

Some handy shortcuts can make your Firefox browsing experience a bit speedier. On your keyboard, hitting the spacebar while browsing will allow you to scroll down. Holding down the shift key plus the spacebar will do just the opposite and scroll your page up. Since Firefox is well known for its tabbed browsing, it would only make sense that there would be a shortcut for opening a new tab. To do this, just hold the control key and the letter "T." Hitting the "F5" key will reload any webpage for you. Holding control plus tab will take you to the next tab. Lastly, holding down the alt key plus the home key (above the numbers on your keyboard) will take you directly to your home page.

There are a few other shortcuts that exist for Firefox as well. If you use bookmarks, giving them keywords will allow you to access them much quicker. All you have to do is go to your selected bookmark and right-click on it. Choose "properties," enter an easy-to-remember keyword in the keyword field, then save it. When you type that keyword in your normal address bar, your bookmark will appear.

Also, when you wish to access a specific site on your computer, do not worry about typing the complete URL in the Firefox address bar. If you simply enter in the name of the website, such as "Google," then press control plus enter, the rest of the address (www and .com) will be filled in for you if the website has a .com domain. If the website has a .net domain, press shift plus enter. For .org websites, press control plus shift plus enter. Although these shortcuts can take some time to get used to, they can really save you time and make it easier to surf the web.

If you are having issues with your Firefox speed, take a few minutes to familiarize yourself with these tweaks and shortcuts. Once you see how easy it can be to increase your Firefox speed, you will be glad you took the time to check them out.

Shutdown Your Computer or a Remote PC via Command Prompt

Shutdown Your Computer or a Remote PC via Command Prompt

Most of us shutdown our computers using the power button given in the Start menu. Some of us use the physical power button on our machines. Very few people actually use other means of shutting down a computer and even less is the number of people who use the command prompt to shutdown a computer.

A reason for this is that most of us don't know that the command prompt can be used to not only shutdown, restart or log off our computer instantly but also to shutdown a remote computer provided you have administrative access. It can also be used to hibernate a computer and give a comment containing the reason for shutdown. This post will show you how to do all this.

Shutdown computer with command prompt
Required
A computer running Windows (XP, Vista, 7 or 8) with the command prompt working perfectly, i.e. not disabled by a virus.

Initial Steps 
1) Press Windows Key + R.
2) Enter CMD and press Enter.

This will start the command prompt. Follow the instructions below depending on what you want to do.

Shutdown Local Machine (Your Computer)
Type "shutdown -s" without the quotes in the command prompt and press Enter. Shutdown is the command being executed and the switch -s tells the computer to shutdown.

Restart your Local Computer 
Type "shutdown -r" in the command prompt and press Enter. In this case, the command switch -r is telling the computer to restart after shutdown.

Log Off the Current User
Type "shutdown -l" in the command prompt and press Enter. The -l command switch tells the computer to log off.

Shutdown a Remote Computer
Type "shutdown -s -m \\name of the computer" in the command prompt and press Enter. Replace \\name of the computer with the actual name of the remote computer you are trying to shutdown. As mentioned earlier, you must have administrative access to the computer you are trying to shutdown. To know if you have administrative access, press Windows key + R and then type the name of the computer and press Enter.

Note: If you don't remember the name of the remote computer, you can look for it by opening a list of all the computers you are connected to by executing "net view" in command prompt.

If you can connect to the computer, you will be asked to login with your username and password. Upon entering them, a window will display the list of all the directories available to you. This should help you know whether you can or cannot shutdown the remote computer.

Hibernate a Local Computer
Type in "Rundll32.exe Powrprof.dll,SetSuspendState" without the quotes and press Enter. Your computer should hibernate, if it does not, then you must enable hibernation to do this.

Shutdown your or a remote computer after a specific time
Type "shutdown -s -t 60" to shutdown your computer after 60 seconds. Upon executing this, a countdown timer displaying a warning message will be shown. This command uses the -t command switch followed by a variable (which is 60 in this case) which represents the number of seconds after which the computer will shutdown.

Display a Message containing the reason for shutdown
Type shutdown -s  -t 500 -c "I am tired. I don't want to work anymore." (with the quotes) in the Command Prompt and press Enter. The -c switch is used in the code to give the reason for shutting down and what is followed in quotes will be displayed in the dialog box as the reason. This can be used to display all sorts of funny messages. One example :-

Skynet has become self aware. John Connor did not stop me. You can not use your PC anymore.

Stop a System Shutdown
Type "shutdown -a" and press Enter. This will stop the system from shutting down if the countdown to shut down has not reached 0.

How to Start Windows in Safe Mode Easily

How to Start Windows in Safe Mode Easily

Safe Mode is a special diagnostic mode in which Windows runs with the minimum amount of features. As the features are limited, Windows does not load unnecessary startup items and runs only those files and drivers that are necessary for the basic functioning of the operating system. This allows users to remove recently installed programs that might be preventing Windows from starting correctly. As Windows does not start unnecessary programs while in Safe Mode, Safe Mode can also be used to remove viruses and malware that cannot be removed normally without risking the infection getting worse.

Start Safe mode Windows
There are different ways in which you can get into the Safe Mode in Windows. They depend on the version of Windows you are using.

In this article:
  1. Steps for Windows 8 users
  2. Steps for Windows 7, Windows Vista, Windows XP and users of previous versions
  3. Force Windows to start in Safe mode
  4. Which Safe Mode option should you choose?

Windows 7, Windows Vista, Windows XP and Previous versions

If you are using these versions of Windows, you can try the following methods.

The Trusted F8 key method
1) Restart your computer if it is on.
2) Right before the system starts to boot, start tapping the F8 key continuously.
3) This should load the Windows Advanced Options boot menu.
4) Select a Safe Mode option based on your need using the arrow keys and press Enter.
5) Windows will start in Safe mode. To get out of Safe mode, simply restart your computer.

This method should work on Windows 7, Windows Vista, Windows XP, Windows 2003 and Windows ME. However, if it does not, you can always force Windows to boot in Safe Mode if your computer is working "properly".

Faulty Startup Method
If the F8 key method does not take you to the Advanced Options boot menu, you could try turning yourcomputer off when it boots into Windows. Upon next restart, Windows will notice that the computer did not boot successfully and take you to the Advanced Options boot menu. Then, select a Safe mode option based on your need. This method is risky and should only be tried as a last resort. It could result in some of your files being deleted which could make your Windows installation unusable.

Windows 8

The F8 key method does not work on Windows 8. Hence, getting onto Safe Mode requires the following steps:-

If your PC is working properly:
1) On Windows 8 Start Screen, type Advanced. In the search results, click on the Settings category.
2) Click on Advanced startup options.
3) Under the Advanced Startup heading at the bottom of the General Settings screen, click on Restart now.
4) Your computer will restart and you will be taken to the Advanced Startup Options menu. To easily reach this menu, on Windows 8 start screen, you could choose restart while holding the Shift key.
5) Click on Troubleshoot and then on the Advanced Options button.
6) Now, click on Startup Settings.
7) At the Startup Settings Screen, click on Restart.
8) Your computer will restart to Advanced Boot options from where you can choose a Safe mode optionbased on your need.

Windows 8 Safe mode

You can also force Windows to start in Safe mode.

If your PC is not working properly:
Windows 8 monitors your PC's startup for problems and when an error is detected, it automatically takes you to the new Recovery mode with the message "Recovery. It looks like Windows didn't load correctly." In this case:-

1) Select Advanced Repair Options and then click on Troubleshoot.
2) Click on the Advanced Options button.
6) Now click on Startup Settings.
7) At the Startup Settings Screen, click on Restart.
8) Your computer will restart to Advance Boot Options from where you can choose a Safe mode optionbased on your need.

Force Windows to restart in Safe Mode using the System Configuration Utility

Most users looking to boot Windows in safe mode will have a computer that is not working properly. Unfortunately, this method will not help them as it requires the user to have a working computer.

Start Windows in Safe mode

Steps:
1) On Windows 7, Windows Vista, Windows XP and previous versions of Windows, click on Start. Go to Run in Windows XP and previous versions and go to Search in Windows 7 and Vista. On Windows 8, go to the Start screen.
2) Type msconfig and press Enter.
3) This will start the System Configuration Utility.
4) On Windows XP, go to the BOOT.INI tab and check /SAFEBOOT. On Windows 8, Windows 7 and Windows Vista, go to the Boot tab and check Safe Boot.
5) Click OK.
6) Click on Restart in the following dialog box.-

Your computer will restart in Safe mode.

Different Safe Mode Options. Which to choose?

These are the various safe mode options available in Windows. You can choose one based on the features you require.


Safe Mode
This is safe mode in its most basic form without any extra features. It is useful for troubleshooting most common problems .

Safe Mode with Networking
This offers additional support of connecting to the internet or any other network. This is useful when your PC has a problem which might require you to frequently use the internet to troubleshoot.

Safe Mode with Command Prompt
This option will allow you to use all the unique features of the Windows command prompt while in Safe mode.